Showing posts with label Save $. Show all posts

Friday, February 20, 2009

Alone in the Kitchen with an Eggplant

Alone in the Kitchen with an Eggplant is a great read. I definitely recommend picking it up from the library next time you are there but this post isn't about this book.

While in City Market a couple days ago I remembered to look in the sale produce section. The section is more like a couple baskets set a top one of the regular produce cases. They aren't very flashy (why would they be?) and they are mostly hidden almost exactly behind one of the hanging scales they have dotted about the place . So, whenever I have a final glance around before heading off to the bulk bins I usually miss having a look in them. This time I remembered. Often there isn't much to find there, some rediculously ripe avocados (way beyond guacamole stage I think), potatoes with eyes that have grown into something more like arms or legs, squashes well and truely beaten but it's always worth a look. In the past I have found bags of citrus that didn't look awesome but knowing that they would be fine to juice I snatched them up. This time there were two glorious eggplants. Why are these beautiful eggplants in here I wonder and pick them up to investigate. I found they both had been slightly damaged, an indentation as though from the corner of something had punctured each of them but otherwise they were perfect. I grabbed them without a second thought.

I don't know if I've ever really mentioned it here but I love eggplant. Love it. Strangely I don't eat it all that often. When Lex and I are in Greece we eat it almost daily (along with far too many olives but I'm pretty sure this has been covered). These eggplant would be roasted. The best way to enjoy it. This is not up for debate by the way, my mind is set. This brings me to a super simple and delicious dinner I whipped up for us last evening.

This can be prepared easily a few different ways depending on preference and doesn't require much in the way of ingredients. I just love the sweet creaminess that roasted eggplants impart. Why oh why don't I cook them more often?


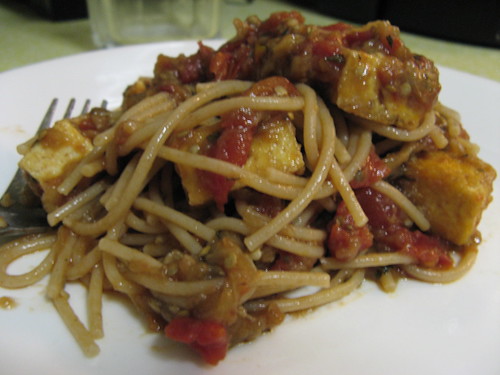
Roast Eggplant & Tofu Pasta

3-4 servings whole grain spaghetti (or other whole grain pasta)
2 medium eggplants
1 lb extra firm tofu
14oz can diced tomatoes
Herbs of choice to taste (basil, oregano, thyme, whatever you have that sounds good)
Salt & pepper to taste

First roast your eggplant. Preheat your oven to 350F. Line a baking sheet with foil (clean up can be a nightmare). Wash your eggplants and prick a few times with a fork to allow the steam to escape. We don't want any explosions. Roast until eggplants until they deflate, insides will become very soft. You can allow the skin char a bit, about 40 mins. Remove from oven and allow to cool enough to handle.

Meanwhile press your tofu for about 30 mins to force out some of the moisture. Cut it up into cubes or whatever shapes you desire. Prepare the fu either by browning it in a pan with a bit of oil or baking it (this can cut calories as you don't need to use oil if you do not wish) in the oven for about 30 mins, turning at least once to allow all sides to brown.

Start pot of water for pasta to boil. Add pasta and cook according to directions for al dente (or prefered texture). Continue on to prepare sauce while pasta cooks. Drain pasta when ready, rinse with cold water to stop cooking and set aside.

Once you can handle your eggplants, open them up and scoop out the flesh into a bowl. Discard skins. Using a fork mash the eggplant a little just to help break it up.

Heat a medium sized pan over medium heat. Add tomatoes and mashed eggplant and heat through. Add in herbs, salt & pepper. Tasting as you go. Add in prepared tofu. Allow flavors to combine. Add pasta to sauce mixture and toss to coat. Serve it up and enjoy.

Friday, January 30, 2009

try try again


This month's challenge is brought to us by Karen of Bake My Day and Zorra of 1x umruehren bitte aka Kochtopf. They have chosen Tuiles from The Chocolate Book by Angélique Schmeink and Nougatine and Chocolate Tuiles from Michel Roux.

Attempt one was a spectacular failure. I have no pictures. Well I could go photograph the bin if you want but y'all should just take my word for it. Complete crap. That, however, is to be expected. My first attempt for all these Daring Bakers Challenges are failures of varying degrees. Sometimes salvageable, sometimes better forgotten. It's all the more frustrating when you use a recipe that has worked for people and it doesn't work for you. You start wondering what the heck is wrong with you that you couldn't follow simple directions. In the end this doesn't necessarily accomplish anything and it's just not that easy. Simple directions can still produce something fairly complex or delicate. In this case a very delicate balance in the batter, in the oven temperature, in the timing and then in the final cookie.

I feel a bit silly about it all now. My second attempt was in another direction. Chocolate. Silly because I work in chocolate. There is always chocolate around my house, around my work. I talk chocolate every day. Why then did I not just go with the chocolate route to begin with? Because I thought I'd be clever and make it a challenge for myself. That'll learn me.

Anyway on with the successful part of the challenge.
Chocolate Tuiles
3.5 oz (100g) dark chocolate (I used Lindt 75% Ecuador)

Temper the chocolate. Spread into desired shapes on a sturdy piece of plastic (or silpat could work). Once set enough to move, shape them as desired (over a glass, rolling pin, whatevs). Remove them from mold right before serving to preserve shape and sheen.
If you are not into tempering you could add a little (1 tsp or less) of vegetable shortening. This should keep the chocolate from blooming. This may also keep the chocolate from completely setting at room temp so you may need to keep it chilled to hold it's shape.

Strawberry Banana Sorbet
1 yellow ripe banana
1 bag frozen straberries (thawed)*
1 tsp-1 Tb lime juice

Toss strawberries, banana and lime juice in the blender of food processor and blend until smooth (or as smooth as you'd like. I went for no chunks). Pour into your ice cream maker and freeze according to manufacturers directions.
You could also use frozen fruit and process this into something of a sorbet in your blender or food processor but unless you have a Vitamix it might be a challenge to get a good consistancy.
*bag can be of any size really depending on how much you want.

This is the taste of summer. Strawberries get me every time.

Tuesday, December 30, 2008

Clearing the Cupboards

With the new year approaching I am quite hooked on the idea of simplifying my life. My kitchen is full of random ingredients that I don't use regularly or bought and never tried. I'm also trying to spend as little money as possible. Using ingredients I already have on hand accomplishes both goals. Hopefully in the coming weeks I will be able to post tasty money saving recipes.

Now, of course, I understand that not everyone has the same random assortment of ingredients to use in their pantry but the following two options are made of rather cost effective ingredients whether you already have them or not. They also have the added bonus of being quite quick when all is said and done. Little prep work and not long cooking times.

After a little Google search through my trusted blogs I came across my first victim, err recipe.

Red Gold Black and Green Chili (adapted from Fat Free Vegan)
1 cup hulled barley, soaked overnight, cooked in 4 cups water and drained, cooking time is reduced by soaking
2 14oz cans canned diced tomatoes, undrained
3 tablespoons water or oil (optional)
3 medium chopped onions
3 cloves garlic, minced
1 heaping teaspoon ground cumin
1 heaping teaspoon chili powder
1 tablespoon hot sauce (we have an atomic hot sauce so I used only 1 tsp)
2 green bell peppers, chopped
2 cups fresh or frozen corn
1 1/2 cups (1 can) cooked black beans, drained
1 1/2 cups (1 can) cooked red kidney beans, drained
salt to taste

Heat a large saucepan adding
the 3 tbsp. water or oil if using (I was using a cast iron pot and did not need additional moisture to prevent sticking). Sauté the onions until they are soft; then stir in the garlic, cumin, chili powder, hot sauce, and bell peppers and sauté for 2 to 3 minutes more. Add the tomatoes and beans to the pan and cook for about 10 minutes. Stir in the corn and the drained barley. Cover and simmer for a few minutes for the flavors to meld. Add salt to taste.

This ended up filling my 3 qt pot to the brim and I used all my barley. Pearl barley will work just fine in this recipe but hulled is more nutritious. I have noticed that canned tomatoes, frozen vegetables and canned beans go on sale frequently so it's best to grab them when they are reduced so you always have a quick easy dinner in your kitchen ready to be thrown together. I also pounce on dried beans when they go on sale and then cook and freeze them as needed to have beans ready for use in my freezer. Once they are cooked you only need to run them under hot water for a bit to slightly thaw and separate them. Drain and toss them in the pot.


Tonight's dinner made me feel super clever but I can't be the first person to think of this. I'm not a fan of split pea soup. I am also not a fan of canned soup. Now I like soup in general, just not the split pea variety and not canned. Canned is ok in pinch but there is also too much salt. So how three cans of split pea soup made it into my pantry I have no idea. Well I do have an idea and it wasn't mine but I never turn down free vegan food. I figured we would find a use for it and if not we would donate it to the food shelf. Anyway, while at work today I had the bright idea of adding currying the soup. That might actually make it palatable. Ok but what to do with all that extra salt. Potatoes! Potatoes can suck up a lot of salt flavor so once I got home I set out to make mashed potatoes with

Chick & Split Pea Curried Gravy
1 can split pea soup (ours was Muir Glen Organic)
2-3 cloves garlic or 1/2 tsp garlic powder (start with this and add more to taste)
1 Tb curry powder
1 tsp garam masala
1/2 tsp cumin
1/4 tsp paprika
1 1/2 cups (or 1 can) cooked chickpeas

Heat sauce pan over medium heat. If you are using fresh garlic then add this to the pan with a splash of water and heat gently for 1-2 minutes. Empty in can of soup. Continue to heat, stiring occationally until simmering. Reduce heat slightly to keep from burning and add spices (including powdered garlic if using). Mix in well then add chickpeas. Let mixture simmer for 5-10 minutes. The timing isn't important but simmering it will allow some of the excess liquid to evaporate off and naturally thicken the mixture and also allows the flavors to blend. Serve over potatoes, rice, veggies, couscous, whatever you can find in your cupboards!
As much as I say I do not like canned soups, they do go on sale frequently and there are so many varieties you can always think of something to add to them to make them a more hearty meal (and to spread out the salt a bit). I didn't measure how much this made. I would guess about 3-4 cups which is easily 4 servings. Since the soup is a fairly blank palate, add whatever your heart desires (and what you have on hand).

Sunday, October 19, 2008

Money Saving Tips

It's time to save some money. You know you have to. The economic climate today, wallstreet, blah blah blah. In the end you may or may not care what's going on in the world of everyone else's money but I know you care about your money and you don't want to spend anymore of it then is necessary unless it's on something really cool and/or fun.

So you want to save some money?

Let me hear you say "yeah!"
*crowd screams* YEAH!!!
I can't hear you
*crowd screams louder* YEAH!!
Then stop buying those damn canned beans!

Silliness aside, really the canned beans have got to go. I know what you're going to say. It's convenient, quick, ready to go, already cooked, etc. I hear you, they are pretty great but there are drawbacks and the alternative isn't as hard as you think.

Canned beans cost (at least in my area) between $0.99 a can to $2 a can, depending on what store you are in, if there are any sales, and conventional versus organic. In a can you get what? About 1.5-2 cups of cooked beans. The labels say 15oz.
For the price of one can of beans you can buy a pound of dried beans. Depending on the bean this roughly equals 6 cups cooked beans. That's equivalent to at least 3 cans, more for some beans. So that's what? $0.30 to $0.50/can? It's a rough estimate but like I said, every bean is a little different as far as weight and cooked size and of course per pound weight on beans varies. But unless I am buying a super special heirloom bean, I never pay more than $3/lb. Usually it's less than $2/lb and that's for organic.

Yesterday, my day off, I spent refilling my freezer with cooked beans. That isn't to say I spent the day slaving over a hot stove cooking beans constantly. I kinda just had them on in the background while I did other things like read blogs, do dishes, cuddle the kitty (even if he didn't want to), chase a bad kitty away so my kitty could come down from the tree so the birds would stop dive bombing him for being up in the tree, you know regular household day off stuff. You can even keep beans cooking pretty safely while you leave the house.

First you gotta buy some beans. Since there are so many colors and sizes I just keep jars of them on the shelves in my kitchen. I find them kinda pretty.
So cooking beans, for me is a vary, umm, unscientific process. Starting the night before I did some necessary prep work. Now I know this is already starting to sound like a long process and it kind of is but not really. Most of the "work" is hands off so hang in there. So the night before I picked some beans out the kinds don't matter. You can soak as much as you'd like, in my containers here about 1-1.5 cups (there are some markings on the sides) will expand to fill the container so I aim for that. Measure out your beans, dump them out onto a rimmed baking sheet (or somewhere you can spread them out without dumping them all over the floor) and have a quick look for nonbeans (you may find pebbles or bits of dirt, these are usually a similar size to the beans so they were not detected during processing), once they are picked over, rinse them and put them in your container. Fill the container with at least as much water as beans. I usually just fill the container with water, a little extra won't hurt them so no worries. Set them aside for 3-8 hrs (over night is easy).
Now when you come back to your beans you'll find them to be significantly bigger then when you left them. Maybe they are even trying to bust out of the container you put them in. It's pretty neat really. Well I think so anyway. Go ahead and drain off your rehydrated beans and now we are ready to cook them. Yesterday I had two cooking processes going. Like I said, I needed to completely refill my freezer so I was cooking a lot of beans.
I usually just use my slow cooker. Dump the beans in, cover with water plus an inch or two, cover slow cooker, set to low or high depending how quickly you need these puppies done. If I'm leaving them on while I'm at work I'll set it to low and they'll be done when I get home. This is perfect for chickpeas which are pretty hardy. I find my beans are done in 2-4 hrs when set to the high setting, the low setting may be too low on your slow cooker to get the job done in a reasonable timeframe but definitely experiment.
The other, no special equipment necessary, method is stove top. Medium size saucepan, cover with water as with the slow cooker and get the water boiling then reduce to a simmer, cover and cook for 1-2 hrs. While the beans are going you don't really need to hover over them. Make sure the beans stay covered with water though. Get other stuff done, this is a perfect lazy day off task or to keep a steady flow of beans, do a batch once every couple of days. I hear pressure cookers are awesome for this but I have never had one or used one.
Once your beans are cooked . . . go ahead and try one silly, that's the only way to check if they are cooked. Unless you've really let them go and it's kinda a pot of mush. If that is the case then we'll call it soup just add some seasonings and enjoy. What I do is drain them and freeze them in freezer bags. Some people really like that bean gravy though so you might want to save that, it's tasty as a replacement for broth in recipes or whatever you can think of. You can freeze the broth separately in containers or ice cube trays then bag the cubes. Since I use freezer bags which are pretty thick/tough I reuse them (just give them a quick rinse and dry them with the rest of the dishes).
Like I mentioned before, my cooking methods here are decidedly unscientific but I dug up some sites to help.
Pressure Cooker cook times chart
Bean Cooking Chart (includes soaking times, regular stove top method and pressure cooker)

So in the end I'm actually going to say, some canned beans can be a good thing. A backup to your freezer when you accidentally use all the ones you had cooked and didn't make more before you needed to use them. Also in the event of an actual emergency, especially if you are expecting to lose power, canned goods are going to serve you pretty damn well.